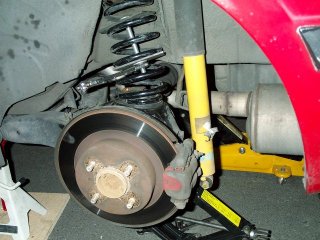
High Performance Springs
 SS Springs are available
from Nissan dealers anywhere. They are made by Motorsport Nissan
(I think). Later model Z31's (the SS models) were accompanied
by these stiffer high performance springs. They are about the
stiffest you can get. I put SS's on the rear of the car and man
did it make a difference. They are accompanied by Bilstein Shocks (see shocks page for important
info.). I have hardly any squat when accelerating and the springs
almost restored my camber fully. I progressed from -2.4 on the
passenger side to -1.9 and on the driver's side from -1.9 to -1.4.
Specifications are between (-1.9,-0.4).
So I was able to avoid
expensive camber kits and installation. The downside is that the
SS's only carry a 1 yr. warranty whereas many other aftermarket
springs offer lifetime warranties. No other spring will restore
stock height like the SS's...most even manage to lower the car
a bit more than where it is, which means camber kits are almost
a must. GroundControl
offers adjustable spring sets which utilize Eibach springs...you can have them produce
a set that will allow you to adjust the spring to stock height
for normal driving and lower the car when you want to. However,
they will only produce a full set for racing Z31's...the front
set is available for street driving, but the rear set is very
high maintanence and the seats must be welded into place. With
rough street driving (potholes, etc.) the weld can break quite
often...so don't expect them to sell you the rear set. In fact,
last time I went to their website (www.ground-control.com) they didn't even list
the front set anymore...who knows what this means.
SS Springs are available
from Nissan dealers anywhere. They are made by Motorsport Nissan
(I think). Later model Z31's (the SS models) were accompanied
by these stiffer high performance springs. They are about the
stiffest you can get. I put SS's on the rear of the car and man
did it make a difference. They are accompanied by Bilstein Shocks (see shocks page for important
info.). I have hardly any squat when accelerating and the springs
almost restored my camber fully. I progressed from -2.4 on the
passenger side to -1.9 and on the driver's side from -1.9 to -1.4.
Specifications are between (-1.9,-0.4).
So I was able to avoid
expensive camber kits and installation. The downside is that the
SS's only carry a 1 yr. warranty whereas many other aftermarket
springs offer lifetime warranties. No other spring will restore
stock height like the SS's...most even manage to lower the car
a bit more than where it is, which means camber kits are almost
a must. GroundControl
offers adjustable spring sets which utilize Eibach springs...you can have them produce
a set that will allow you to adjust the spring to stock height
for normal driving and lower the car when you want to. However,
they will only produce a full set for racing Z31's...the front
set is available for street driving, but the rear set is very
high maintanence and the seats must be welded into place. With
rough street driving (potholes, etc.) the weld can break quite
often...so don't expect them to sell you the rear set. In fact,
last time I went to their website (www.ground-control.com) they didn't even list
the front set anymore...who knows what this means.
 For removal of the rear
springs...follow directions in your Repair manual. I found it
nice to produce my own spring removers. I got the idea from some
Mike on the ZBoard some time ago. You take 1/4" inch thick
(I used 3/8") sheet metal and make your own tool...I got
a 3" X 12" strip from Eagle Hardware and they did all
the cutting for me...we made 5" cuts (you might want to make
them 6" cuts...but that length could be tight inside the
spring well). Then drilled a hole right in the middle. You need
to make the whole JUST big enough for a carriage bolt to slip
through. You can make two tools or one...two just made sense because
I had to buy a whole foot of metal and I wouldn't have used it
for anything else.
Get two carraige bolts
about 8" long, some thick washers and two bolts that fit
the carraige bolts. Now then, once you've followed directions
in your repair manual and you're to the point that you need to
remove the springs, use your tools...place once peice of sheet
metal two spring levels from the top and one of them two from
the bottom and then insert the carraige bolt with one washer from
the top. Place the nut on the carraige bolt and loosely tighten
(no washer necessary, but you can use one). Ensure that the spring
makes good contact on the metal sheets on ALL four corners and
start to tighten the carriage nut. Make sure the metal plates
continue to contact the spring on all four corners as you tighten.
Eventually you'll be
able to remove the spring after lowering the control arms with
a jack (at one point of the removal the repair manual tells you
to jack up the control arm in order to compress the spring...you
then use the tools to tighten the spring up, and then you lower
the control arms to give you enough clearance to remove the springs).
As an extra precaution, you may want to make small bends in the
corners of the metal sheets to hold the springs on better...I
don't know what your hardware store can do for you there. I assume
no responsibility for your experimentation with this tool...all
I can say is that it worked for me. I was nervous, but it worked.
I had to do some REPAIR WORK after my first try because the
springs were squeaking and the shock bolt was loose.
For removal of the rear
springs...follow directions in your Repair manual. I found it
nice to produce my own spring removers. I got the idea from some
Mike on the ZBoard some time ago. You take 1/4" inch thick
(I used 3/8") sheet metal and make your own tool...I got
a 3" X 12" strip from Eagle Hardware and they did all
the cutting for me...we made 5" cuts (you might want to make
them 6" cuts...but that length could be tight inside the
spring well). Then drilled a hole right in the middle. You need
to make the whole JUST big enough for a carriage bolt to slip
through. You can make two tools or one...two just made sense because
I had to buy a whole foot of metal and I wouldn't have used it
for anything else.
Get two carraige bolts
about 8" long, some thick washers and two bolts that fit
the carraige bolts. Now then, once you've followed directions
in your repair manual and you're to the point that you need to
remove the springs, use your tools...place once peice of sheet
metal two spring levels from the top and one of them two from
the bottom and then insert the carraige bolt with one washer from
the top. Place the nut on the carraige bolt and loosely tighten
(no washer necessary, but you can use one). Ensure that the spring
makes good contact on the metal sheets on ALL four corners and
start to tighten the carriage nut. Make sure the metal plates
continue to contact the spring on all four corners as you tighten.
Eventually you'll be
able to remove the spring after lowering the control arms with
a jack (at one point of the removal the repair manual tells you
to jack up the control arm in order to compress the spring...you
then use the tools to tighten the spring up, and then you lower
the control arms to give you enough clearance to remove the springs).
As an extra precaution, you may want to make small bends in the
corners of the metal sheets to hold the springs on better...I
don't know what your hardware store can do for you there. I assume
no responsibility for your experimentation with this tool...all
I can say is that it worked for me. I was nervous, but it worked.
I had to do some REPAIR WORK after my first try because the
springs were squeaking and the shock bolt was loose.